
Painting the interior of your home can be quite an investment if you hire a professional. You can easily do the work yourself, if you have the time and the energy. Being a exeter painter for over fifteen years, I am able to provide you with complete instructions on the preparation, and painting the way the pros do.
Part One: Interior Painting Preparation
Step 1:
Get a bucket of warm water and add a cup of vinegar, wash walls with a sponge and do not let the water drip to the floor, or let the sponge drip water on the floor.
Repeat step one without vinegar.
Step 2:
With a small 4″ and 6″ trowel spread the compound over small nicks and holes/ Allow to dry up to one day. Repeat as needed until the walls are completely and equally flat. Note if the walls are textured you will have to still do this process and blend in with the existing texture that is there.
Step three:
Lightly sand the walls after each coat of compound. Be sure to cover everything with plastic as this dust will clearly make it to the other side of the house! Make a wall around the room you are working in with painters plastic and painters tape, before you sanding!
Step 4:
With a damp rag wipe the entire wall as many times as needed until there is no more dust on the walls or dust streaks.
Step 5:
Caulk around all the trim for quality finishes. Cut the tip of the tube of caulking so that is at 45-degree angle and put the tube into caulking gun. Be sure to have a pail of cold water and a painters’ rag. Hold the caulk gun with both hands and place the 45-degree angle of the tube so that it is flush in the corner of where you are caulking. Move the caulk gun steadily without stopping to the other corner. You may have to squeeze the trigger depending on the size of the trim you are doing. But always keep it moving steadily. Before you move on to another area that you may caulk, take the damp rag and ring it out. Wrap your index finger with the rag and put in corner of where you started to caulk. Steadily and smoothly move your finger down, to where you stopped filling in the caulk. If you mess up the rhythm find a spot on the rag where there is no caulk, finesse until there can be no visible marks in the bead of caulk that you put in this corner. There should be caulk on the wall. When its completely dry you should not see any evidence of caulk. Repeat this everywhere as needed, and in fill in any kind of a crack that can be seen in-between windows, doors, floor and ceiling trim if it applies. After you apply paint to trim and walls, should there be caulk visible, you must cut it out with a razor and a painters tool. Re-caulk and repaint the trim until no caulk is seen.
Part 2: Ceiling Preparation and Painting
Always paint the ceiling first. You will need the following supplies to properly paint a ceiling:
▸ ceiling paint
▸ paint tray
▸ paint tray liners
▸ 2″ paint brush
▸ paint roller frame and roller sleeve (make sure paint roller is adjustable for extension pole)
▸ painters 5 in 1 tool
▸ painter plastic & painters tape
▸ extension pole
▸ a safe ladder, preferably 6 foot
Step 1: Cover entire floor area of where ceiling is to be painted. Be sure the room is completely emptied out.
Step 2: Using painters tape, place in-between ceiling and wall. Apply tape on walls as close to the ceiling as possible. There is a straight edge on the tape. Any slight crookedness will be seen. As you are placing the tape fold bottom half of tape up toward ceiling. Place tape everywhere that the ceiling meets the wall. Many people can do this with sections of tape and some can do it with one piece of tape, this comes with experience and practice. Place plastic on tape so all walls are covered.
Step 3: Get ready to paint the ceiling. Start with a very clean 5 gallon bucket and a clean, brand new t-shirt. You must filter the paint. I recommend a new cotton t-shirt because it is usually lint free, clean, and the fabric is good for filtering precisely. Cut the t- shirt in half and tie with a string around the rim of the bucket, leaving a little dip in the shirt. Pour the paint into the shirt a little at a time with a mixing stick (usually free when you buy a gallon of paint) from side to side scrape paint against shirt lightly. Gradually add more as it presses through the shirt into the bucket..
Step 4: Add paint to tray and roll the roller back and forth, on the tray, leaving paint on the roller. Do not over saturate the roller so that the paint is dripping off when you pick it up out of the tray. Be sure that paint is evenly spread on all parts of roller sleeve. Let sit in middle of room.
Step 5: With a 2 inch angled or flat paint brush, dip your paint brush halfway into the paint several times and wipe off the excess paint onto the rim of the can. To avoid wasting paint, do this so the excess paint goes back into the can.. Paint ceiling wall line at least 2″ onto ceiling. When painting the trim it is okay to get the paint onto the painters tape but if your not painting the walls you will take your time NOT to get paint onto the tape. Move ladder and paint as you move around the room. Be sure the ladder has a paint can holder/tray. Never leave the paint can on the ladder. Always take care to take the paint can with you when you get off the ladder. Be sure to leave only enough paint in the can to cover halfway up the bristles. If you spill your paint by accident you wont have too much to clean up. Always hold onto the ladder with one hand while climbing down. This way you can leave your paint brush in the paint can while climbing down. While climbing down a ladder, it is best to hold on securely with one hand, and in the other balance the paint brush over the can while still holding the handle, so any drips will be caught in the can. Now that you are done with the first coat of ceiling , trim/cut you are ready to roll out the ceiling.
Step 6: Coat the roller in paint evenly. Take your extension poll and screw it to roller frame. Depending on your height, adjust the extension poll so that you can hold with two hands and reach the ceiling carefully. Start in one corner of the room. Roll paint on to ceiling in both directions close to wall. Blend into the 2″ cut you made earlier, and get as close to ceiling as possible without hitting ceiling with the roller frame. Wet the roller again and re-roll the section you just did. Once you have about a 5×5 area, move straight down until you reach the other end of the room. Work in 5×5 sections, all the way across the ceiling. Then on your next ‘row’ overlap the adjoining areas by about six inches. Ceilings that have lots of natural light should be left to professional . Re-coat as needed.
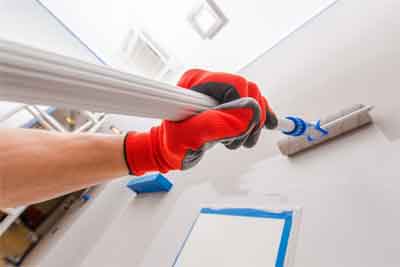
Part 3: The Trim
Next to be painted in the room is the trim. Use painters tape around glass and for moving parts, such as hinges, and windows. Use a piece of paper or painters tape , carefully paint around these areas. When you apply paint to window trim try to move fast and accurately. Try not to put paint on the tape. The tape is there to help you learn, eventually you will not need the tape if you plan to paint on a regular basis. If you are slow without the tape, than put the tape on and immediately remove it when you are done. Be careful not to let tape hit the drying paint because it will leave a mark. Do not leave tape on glass, as it is very time consuming to remove if you do. When painting door trim it is okay to get a little on the wall if it is brushed but not a full stroke as that will leave a different texture on the wall.
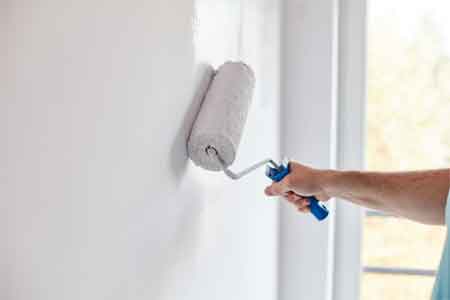
Part 4: Painting Walls Use set up instructions for painting a ceiling. Use your wall paint, be sure to over lap and finesse blend accordingly. Follow same instructions for rolling out the ceiling.